


One of the toughest things to understand with regard to PCB vias would be annular ring calculation. This can pretty much be a challenge to beginners in the field of PCB design. Have you also got stuck for the right size of annular rings for your vias?
It might sound simple, but it is usually an issue that affects electrical connections and mechanical strength.
Do not worry; this article will be your step-by-step guide to understanding annular ring calculation. By the end, you will know exactly how to calculate the annular ring size and avoid common mistakes.
So, let’s get started.
Understanding Annular Rings
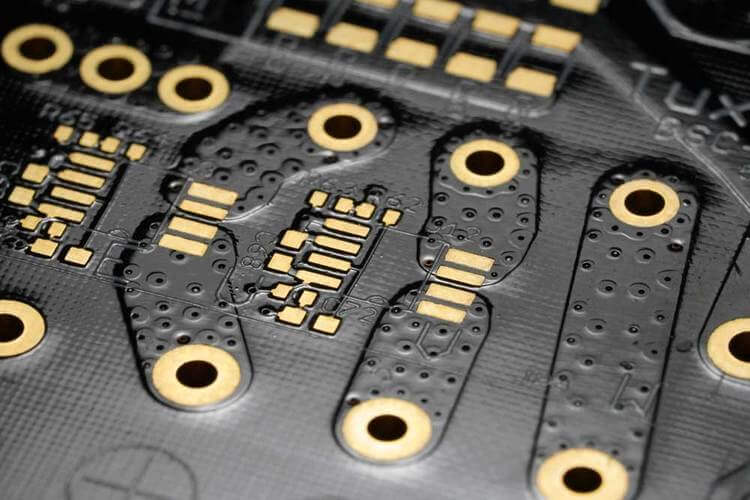
An annular ring is the copper area that remains around a drilled hole in a PCB after forming a via. It is very important since it surrounds the hole, gluing different layers of the PCB together.
The annular ring thus plays an important role in the workability and longevity of your PCB:
- Electrical Connection:A properly sized annular ring ensures a reliable electrical connection between via layers. If there is not enough copper density around the hole, the connection can be weak and lead to signal loss or failure.
- Mechanical Strength:The annular ring also provides mechanical support. Properly sized rings prevent the via from collapsing or cracking off during its drilling and assembly. This maintains the integrity of your PCB, especially in highly stressed environments.
But what are the factors affecting annular ring size? Let’s discuss this in detail.
Factors Affecting Annular Ring Size
There are two main factors that affect annular ring size:
- Via Drill Diameter
The diameter of the hole that is drilled for the via directly affects the annular ring size. Consequently, the larger the drill diameter, the smaller the annular ring that will be LEFT, and vice versa.
It is thus important to strike a balance in the drill diameter to have enough copper remaining around the hole to provide some mechanical support and reliable connections.
- PCB Pad Diameter
The pad diameter is where the via starts and also affects the annular ring size. By increasing the pad diameter, there will be more copper around the hole, increasing the annular ring.
Reducing the pad diameter will minimize the annular ring. The pad size shall be such that it matches or complements the drill diameter for optimum performance.
Common Issues With Annular Rings
Some of the most common issues with annular rings are:
- Insufficient Annular Ring Size:If the annular ring is too small, it can lead to poor electrical connections between the via layers. This usually results in weak signals or failed circuits. Moreover, a smaller annular ring might offer weaker mechanical support; thus, during manufacturing, there may be chances of via collapsing or cracking.
- Manufacturing Challenges:Setting an annular ring properly can be difficult either with tight tolerances or in high-density designs. Annular ring size is dependent on the drilling and plating processes. You must account for these in your design for possible problems in the manufacturing of printed circuit boards.
Now you know the basics of an annular ring, it’s time to discuss it’s calculation in detail.
Annular Ring Calculation
To ensure your PCB vias have the correct annular ring size, you need to perform a straightforward calculation. Here’s the formula you’ll use:
Annular Ring Size =
This formula helps you determine the width of the annular ring surrounding the drilled hole.
- Pad Diameter: This is the diameter of the copper pad on the PCB that surrounds the via hole.
- Drill Diameter: This is the diameter of the hole drilled through the PCB for the via.
By subtracting the drill diameter from the pad diameter and then dividing by 2, you get the width of the annular ring.
This calculation ensures that your vias will have enough copper around them for both electrical connectivity and mechanical stability.
Step-by-step guide and examples of calculation methods
Here’s a simple, step-by-step guide to calculate the annular ring size, complete with an example to illustrate the process:
1)Identify Values
First, gather the required values from your PCB design specifications:
- Pad Diameter: The diameter of the copper pad surrounding the via.
- Drill Diameter: The diameter of the hole drilled for the via.
Example Values:
- Pad Diameter: 0.080 inches
- Drill Diameter: 0.040 inches
2)Substitute Values
Plug these values into the formula:
Annular Ring Size =
Using our example values:
Annular Ring Size =
3)Calculate
Perform the subtraction and division:
Annular Ring Size =
4)Verify
Check the calculated annular ring size against the design requirements and industry standards to ensure it meets the necessary criteria for electrical connectivity and mechanical strength.
Example Result:
The annular ring size in this example is 0.020 inches. This width provides the necessary copper around the via to ensure reliable connections and structural integrity.
Final Words
Calculating the annular ring size for PCB vias might seem complex, but it’s essential for ensuring both reliable electrical connections and mechanical strength. By understanding the factors that affect the annular ring and using the simple formula provided, you can easily determine the correct size.