


Do you know what a Gerber file is in PCB design? Maybe you might have come across it but you aren’t so sure of what it does. Not to worry. Understanding Gerber files is super important in PCB design, and we are here to help you out.
In this article, we will be diving into Gerber files bit by bit and explaining how they make PCB manufacturing smooth.
So let’s get started.
What is a Gerber File in PCB Design?
In PCB design, the Gerber file holds a place of critical importance. It is an ASCII text file. It contains a description of images of a PCB layout used by the PCB software to bring them to life.
The copper layers, solder mask, legend, and drill data are all included in these images. The Gerber file format is also the de facto standard used by the PCB software industry to encapsulate detailed instructions for photo-plotting machines, which play a pivotal role in the PCB manufacturing process.
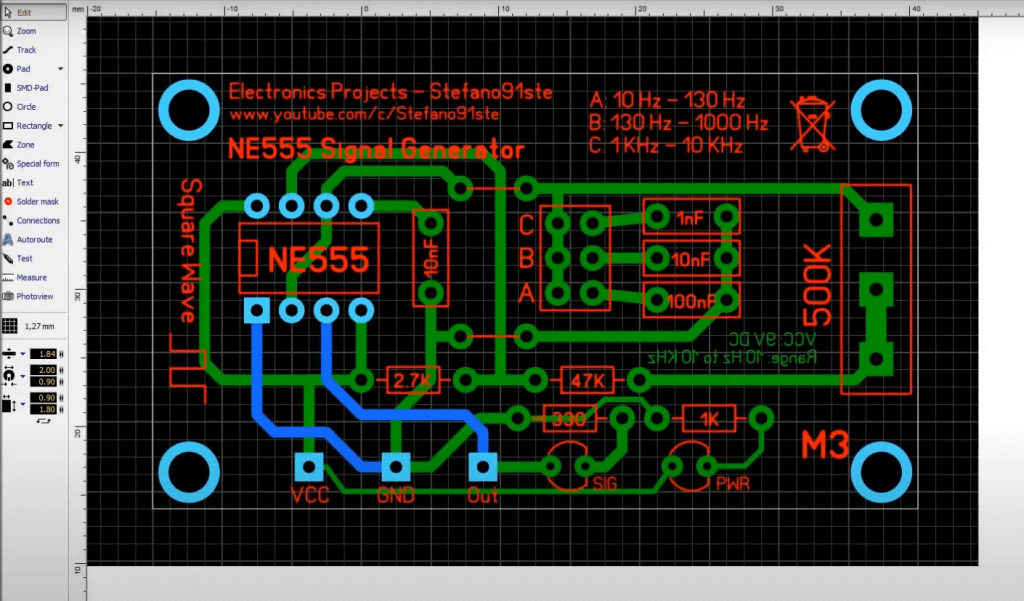
Basically, the Gerber file is a store document of the shape and location of each element in a PCB layout. A Gerber is prepared for each layer of the PCB layout.
The modular approach allows the use of individual layers in preparing stencils for each of the fabrication and assembly steps.
The Gerber file data consists of configuration parameters, aperture definitions, XY coordinate locations, and appropriate commands for draw and flash.
In effect, being in an ASCII form, the content of a Gerber file may not be directly read or understood without the use of appropriate tools. However, viewed through a Gerber viewer application, these files give you a vision of the layout of a PCB just as you may see with electronic CAD (ECAD) software.
This is important to give the manufacturers a vision of the board before going for a quote or actual fabrication.
This format has later evolved with Extended Gerber, known as RS-274X, which now also allows adding meta-information to the graphics objects, adding depth to the information in the file.
Now, let’s look at the details of a Gerber file.
Components of a Gerber File
- Copper Layers: These are the layers that contain the traces of copper, which are the basis of the electrical connections inside your PCB. The Gerber file holds each copper layer in your design, representing exactly the shape and place of the traces within the layer.
- Solder Mask Layers:The solder mask layers specify where solder is intended to go and where not. This layer ensures that the solder will stick properly only where it has to, preventing shorts and creating the right electrical connections.
- Silkscreen Layers:The silkscreen layers denote the markings and labels that are printed on the surface of the PCB. The information these layers are meant to carry includes component outlines, reference designators, and other critical information to be used during assembly or troubleshooting.
- Drill Data: These data give the size and exact locations of holes that should be drilled in a PCB in order to fix the component and through-hole connections. These data help in making exact drilling in the manufacturing of PCBs.
- Associated Codes for Each Element:Associated with each element in the Gerber file are codes that represent or indicate to PCB manufacturing equipment how the element should be interpreted or processed. The codes assure that the digital design is translated reliably and accurately into physical form.
Each of these components is quite critical for the determination of the layout and characteristics of your PCB design.
Accurate representations of every layer and each element in your Gerber file will assist the manufacturers to properly reproduce your design at the fabrication stage, eventually resulting in a high-quality finished product.
Now you know the basics of Gerber file in PCB design, it’s time to learn how do you export Gerber file.
Exporting Gerber Files
To export Gerber files, these are the 3 most important steps you will take:
1.Choosing the Appropriate Gerber Version (RS-274X):
Before exporting Gerber files, you have to choose the right version of the Gerber: one that will have no problems being understood by the equipment that the PCB will be manufactured with.
RS-274X, the formal name for the Extended Gerber format (also known as Extended Gerber), is the most widely accepted industry standard used, mainly because of the advanced functionalities it offers.
Most of the modern packages for software designing PCBs have this format, and therefore, it has been favored in the use for exporting Gerber files.
2.Defining Layers:
Once you’ve selected the appropriate Gerber version, the next step is to define the layers you want to include in the export. Typically, each layer of your PCB design will be exported as a separate Gerber file.
This includes copper layers, solder mask layers, silkscreen layers, and any other relevant layers. Make sure to review your design software’s documentation for guidance on how to specify which layers to include in the export.
3.Specifying Units:
Before finalizing the export, it’s essential to specify the units for the Gerber files. PCB design software allows you to choose between different units such as inches or millimeters, depending on your preference and the requirements of your manufacturing process.
Selecting the correct units ensures that the dimensions and measurements in the Gerber files are accurately represented during fabrication.
Once you’ve completed these steps, you’re ready to export your Gerber files.
Best Practices for Gerber File Creation
Here are some additional tips to help you export Gerber files smoothly:
- Performing Design Rule Checks (DRC):
Before exporting your Gerber files, it’s crucial to run design rule checks. These tools analyze your design for potential errors like minimum trace widths or clearance between traces.
By doing thorough DRC checks, you can catch and fix issues early on, reducing the risk of manufacturing errors and ensuring your PCB’s reliability.
- Naming Conventions for Layers:
Establish clear and consistent naming conventions for your PCB layers. Use descriptive names like “Top Copper” or “Bottom Solder Mask.” This makes it easier for you and your manufacturer to identify and understand the different layers, reducing confusion during fabrication.
- Ensuring Proper Gerber File Viewers for Verification:
Before finalizing your Gerber files, verify their accuracy using specialized Gerber file viewer software.
These tools let you visualize and inspect your PCB design closely. Make sure you have reliable Gerber file viewer software with features like layer visibility toggling and measurement tools for thorough verification.
- Collaboration with PCB Manufacturer:
Keep an open line of communication with your PCB manufacturer throughout the design process. Consulting with them early on helps address any concerns regarding manufacturability and ensures your Gerber files are optimized for efficient production.
- Verification and Validation:
Before finalizing your Gerber files, conduct thorough verification and validation checks. Use Gerber file viewers and other validation tools to review for errors or missing elements. Consider performing test runs or prototypes to validate manufacturability before full-scale production.
By following these best practices, you can enhance the quality and reliability of your Gerber files, leading to successful PCB manufacturing outcomes.
FAQs
Why is Gerber file important?
Gerber files are crucial in PCB manufacturing as they serve as the standard format for conveying PCB design information to manufacturers. They contain detailed instructions for photoplotting machines, specifying the layout of copper layers, solder masks, silkscreen layers, and more.
Without Gerber files, manufacturers wouldn’t have the necessary guidance to accurately produce PCBs according to the designer’s specifications.
What is the difference between Gerber file and board file?
A Gerber file specifically contains instructions for manufacturing a PCB, detailing the layout of various layers and components. On the other hand, a board file (such as those used in CAD software) is a more comprehensive representation of the entire PCB design process, including schematic diagrams, component placement, routing, and other design-related information.
In essence, Gerber files focus solely on manufacturing instructions, while board files encompass the entire design process.
What is the difference between Gerber and CAD files?
Gerber files and CAD files serve different purposes in the PCB design process. Gerber files, as mentioned earlier, contain manufacturing instructions for producing PCBs, while CAD files encompass the entire design process, including schematic capture, component placement, routing, and more.
CAD files are typically created and edited using specialized PCB design software, while Gerber files are generated from these CAD files for manufacturing purposes.
Conclusion
In conclusion, learning Gerber files is key for anyone involved in PCB design and manufacturing. These text files are vital for explaining PCB layouts to manufacturers, giving precise instructions for photoplotting machines.
They ensure PCB designs are faithfully recreated during manufacturing by detailing copper layers, solder masks, silkscreen layers, and drill data.